Preface
In [previous notes](/articles/varying 变量与内插-webgl 笔记 7/), we used varying variables to pass color values to fragment shader, achieved gradient effects, and more useful color setting method is texturing (texture mapping)
1. Principle
Texturing is mapping colors from images onto geometric shapes, steps as follows:
-
Specify texture coordinates for each vertex in vertex shader
-
Then in fragment shader extract texel colors from texture image according to each fragment's texture coordinates
Here still use varying variables to pass texture coordinates, and because there's interpolation process, images can perfectly cover geometric shapes
Texture coordinates are a new coordinate system, different from both canvas and WebGL coordinate systems, origin at canvas bottom-left corner, s-axis positive to right, t-axis positive upward, canvas top-right corner coordinates are (1.0, 1.0)
2. Texture Mapping
Special note: Image format has no restrictions, can use any format images supported by browser, but as texture image dimensions must be 2^mx2^n, otherwise will error:
WebGL: drawArrays: texture bound to texture unit 0 is not renderable. It maybe non-power-of-2 and have incompatible texture filtering or is not 'texture complete'. Or the texture is Float or Half Float type with linear filtering while OES_float_linear or OES_half_float_linear extension is not enabled.
This is called NPOT problem (Non Power Of Two), is common knowledge of texturing, non-2^mx2^n dimension images can also be textured, but usually more complex and more performance consuming
1. Set Texture Coordinates
Establish connection between texture coordinates and WebGL coordinates, set texture coordinates corresponding to vertices, then when fragment shader executes extract texels through gl_FragColor = texture2D(u_Sampler, v_TexCoord); to set fragment colors, image is pasted on
Shader source programs as follows:
// Vertex shader source program
var vsSrc = 'attribute vec4 a_Position;' +
    'attribute vec2 a_TexCoord;' +  // Accept texture coordinates
    'varying vec2 v_TexCoord;' +    // Pass texture coordinates
    'void main() {' +
    'gl_Position = a_Position;' +   // Set coordinates
    'v_TexCoord = a_TexCoord;' +    // Set texture coordinates
'}';
// Fragment shader source program
//!!! Need to declare floating point precision, otherwise error No precision specified for (float)
var fsSrc = 'precision mediump float;' +
    'uniform sampler2D u_Sampler;' +    // Sampler
    'varying vec2 v_TexCoord;' +        // Accept texture coordinates
    'void main() {' +
    'gl_FragColor = texture2D(u_Sampler, v_TexCoord);' + // Set color
'}';
Among them sampler2D is sampler type, image textures are ultimately stored in this type of object
In fragment shader extract texel colors through texture2D(sampler2D sampler, vec2 coord), first parameter is texture unit number, second parameter is texture coordinates, return value is determined by internalformat parameter passed to gl.texImage2D, if texture image is unavailable, return vec4(0.0, 0.0, 0.0, 1.0)
2. Configure and Load Texture
Loading images method is still new Image, but WebGL doesn't allow using cross-origin texture images, specific steps as follows:
-
Create texture object
// Create texture var texture = gl.createTexture(); // Create texture object -
Create image
var image = new Image(); -
Add load event handler to image, configure texture in event handler
image.onload = function() {
    //---Load texture
    // 1.Flip texture image on y-axis
    gl.pixelStorei(gl.UNPACK_FLIP_Y_WEBGL, 1);
    // 2.Enable texture unit 0
    gl.activeTexture(gl.TEXTURE0);
    // 3.Bind texture object to target
    gl.bindTexture(gl.TEXTURE_2D, texture);
    // 4.Configure texture parameters
    gl.texParameteri(gl.TEXTURE_2D, gl.TEXTURE_MIN_FILTER, gl.LINEAR);
    // Fill blank areas with image edge colors
    // gl.texParameteri(gl.TEXTURE_2D, gl.TEXTURE_WRAP_S, gl.CLAMP_TO_EDGE);
    // Mirror fill (axisymmetric)
    gl.texParameteri(gl.TEXTURE_2D, gl.TEXTURE_WRAP_S, gl.MIRRORED_REPEAT);
    // 5.Configure texture image
    gl.texImage2D(gl.TEXTURE_2D, 0, gl.RGB, gl.RGB, gl.UNSIGNED_BYTE, image);
    // 6.Pass texture unit 0 to shader
    gl.uniform1i(u_Sampler, 0);

    // Draw rectangle
    gl.clear(gl.COLOR_BUFFER_BIT);
    gl.drawArrays(gl.TRIANGLE_STRIP, 0, arrVtx.length / 4);
};
Texture configuration process is relatively complex, will expand in detail later
-
Assign image.src to load image
image.src = 'miao256x128.png';
Note image dimensions, error message's non-power-of-2 tells us must use 2^mx2^n dimension images as textures
3. Internal State
As figure:
[caption id="attachment_917" align="alignnone" width="605"]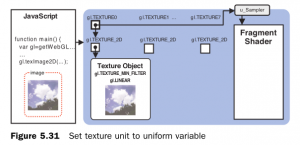 webgl-texture[/caption]
3. Configure Texture
1. Flip Texture Image on y-axis
// 1.Flip texture image on y-axis
gl.pixelStorei(gl.UNPACK_FLIP_Y_WEBGL, 1);
If not flip will find pasted image is upside down, like pasting "Fu" character, because t-axis in WebGL texture coordinate system and y-axis in image coordinate system are opposite directions. Image coordinate system is the 4th coordinate system we encountered, coordinate axes/origin same as canvas coordinate system
Of course, can also manually flip y coordinates, let y = 1.0 - y in fragment shader, or, can also paste upside down.. but why not use such convenient function?
gl.pixelStorei(pname, param)
---
pname
    gl.UNPACK_FLIP_Y_WEBGL Flip image on y-axis
    gl.UNPACK_PERMULTIPLY_ALPHA_WEBGL Multiply A to each component of image rgb color values
param
    0 or non-0 integer
Note: Parameter values can only be integers, not true/false
2. Enable x Texture Unit
// 2.Enable texture unit 0
gl.activeTexture(gl.TEXTURE0);
WebGL uses texture unit mechanism to use multiple textures simultaneously, each texture unit manages one texture image, gl.TEXTURE0~7 total 8, that is can only manage 8 texture images simultaneously at most
Before using texture units, need to activate it through gl.activeTexture(gl.TEXTURE0);
3. Bind Texture Object
// 3.Bind texture object to target
gl.bindTexture(gl.TEXTURE_2D, texture);
Tell WebGL system what type of texture texture object uses, supports 2 types of textures: gl.TEXTURE_2D, gl.TEXTURE_CUBE_MAP, similar to buffer operations, also specify target, parameter count and meanings are also similar
Similarly, in WebGL also cannot directly operate texture objects, must by binding texture objects to texture units, then operate texture objects by operating texture units
4. Configure Texture Parameters
// 4.Configure texture parameters
gl.texParameteri(gl.TEXTURE_2D, gl.TEXTURE_MIN_FILTER, gl.LINEAR);
// Fill blank areas with image edge colors
// gl.texParameteri(gl.TEXTURE_2D, gl.TEXTURE_WRAP_S, gl.CLAMP_TO_EDGE);
// Mirror fill (axisymmetric)
gl.texParameteri(gl.TEXTURE_2D, gl.TEXTURE_WRAP_S, gl.MIRRORED_REPEAT);
Set specific way texture images map to images, how to get texel colors according to texture coordinates? Repeat fill texture according to which way? That is how to interpolate to generate fragments
texParameteri(target, pname, param)
---
target
    Texture type, value is gl.TEXTURE_2D or gl.TEXTURE_CUBE_MAP
pname
    Texture parameter, value is gl.TEXTURE_MAG_FILTER indicates how to enlarge texture when texture size is smaller than graphic size, default value is gl.LINEAR
        Or gl.TEXTURE_MIN_FILTER indicates how to shrink texture when texture size is larger than graphic size, default value is gl.NEAREST_MIPMAP_LINEAR
        Or gl.TEXTURE_WRAP_S indicates how to fill areas on left or right side of texture image, default value is gl.REPEAT
        Or gl.TEXTURE_WRAP_T indicates how to fill areas above and below texture image, default value is gl.REPEAT
param
    Parameter value, gl.TEXTURE_MAG_FILTER and gl.TEXTURE_MIN_FILTER optional values are gl.NEAREST and gl.LINEAR, former indicates use color value of pixel closest to mapped pixel center on texture, latter indicates use weighted average of color values of 4 pixels closest to new pixel center, better effect, but larger overhead. These 2 types are non-pyramid textures, there are also pyramid textures (not commonly used, not introduced)
    gl.TEXTURE_WRAP_S and gl.TEXTURE_WRAP_T optional values are gl.REPEAT tile, gl.MIRRORED_REPEAT mirror tile, gl.CLAMP_TO_EDGE use texture image edge values
Because gl.TEXTURE_MIN_FILTER's default value is special pyramid texture, so need to modify gl.texParameteri(gl.TEXTURE_2D, gl.TEXTURE_MIN_FILTER, gl.LINEAR);, if not modify will error, and won't display texture
5. Configure Texture Image
// 5.Configure texture image
gl.texImage2D(gl.TEXTURE_2D, 0, gl.RGB, gl.RGB, gl.UNSIGNED_BYTE, image);
Allocate texture image to texture object, simultaneously tell WebGL system about some characteristics of texture image
gl.texImage2D(target, level, internalformat, format, type, image)
---
target
    Texture type, value is gl.TEXTURE_2D or gl.TEXTURE_CUBE_MAP
level
    Pass in 0, this parameter is prepared for pyramid textures, generally don't use this parameter
internalformat
    Image's internal format, must be same as format value
format
    Image's external format, determine according to image format jpg/bmp use gl.RGB, png use gl.RGBA, grayscale image use gl.LUMINANCE or gl.LUMINANCE_ALPHA, additionally there's gl.ALPHA
type
    Texture data type, usually use gl.UNSIGNED_BYTE, optional values also include gl.UNSIGNED_SHORT_5_6_5, gl.UNSIGNED_SHORT_4_4_4_4, gl.UNSIGNED_SHORT_5_5_5_1
image
    Image object containing texture image
6. Pass x Texture Unit to Sampler Variable in Fragment Shader
// 6.Pass texture unit 0 to shader
gl.uniform1i(u_Sampler, 0);
In this example sampler is declared as uniform sampler2D type, uniform is because texture images don't change with fragments, sampler2D corresponds to gl.TEXTURE_2D, while samplerCube is for gl.TEXTURE_CUBE_MAP type textures
Through gl.uniform1i(u_Sampler, 0); assign value to sampler2D variable, 1 indicates number of components passed in, i indicates component is int type, this is WebGL's conventional naming method, for example gl.uniform4fv(name, value) indicates value of value should be 4-dimensional vector (typed array with 4 elements)
4. DEMO
For complete examples containing above code, please see:
-
Single image texture: http://www.ayqy.net/temp/webgl/texture/index.html
-
Multi-image texture: http://www.ayqy.net/temp/webgl/texture-multi-image/index.html
Multi-image texture means pasting multiple images on same area, for example:
[caption id="attachment_918" align="alignnone" width="218"] webgl-texture-multi-image-example[/caption]
Overlay effect is result of multiplying 2 texel color value components, vec4(r1, g1, b1, a1) * vec4(r2, g2, b2, a2), result vector is vec4(r1 * r2, g1 * g2, b1 * b2, a1 * a2), so color value left multiply right multiply effects are same
Multi-image texture internal state as figure:
[caption id="attachment_919" align="alignnone" width="604"]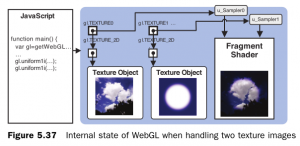 webgl-texture-multi-image[/caption]
5. Summary
Texture mapping principle is very simple: read colors from texture images, then assign to fragments, varying variable interpolation guarantees uniform shading
But operation is relatively complex, so we again encapsulated util, interface description as follows:
/**
 * load texture image
 * by default, configure gl.TEXTURE_MIN_FILTER as gl.LINEAR
 *!!! can be overrode at callback
 * @param  {String}   imgPath  texture image path
 * @param  {Function} callback(image, unit) args: image object and texture unit number
 * @return
 * @throws {Error} If all texture unit was active now
 */
function loadTexture(imgPath, callback) {
    //...
}
Use callback to guarantee flexibility, specific implementation details please see gl-util.js
Up to here, WebGL's most basic things are finished, next note is about detailed explanation of GLSL ES, then after that is endless matrix vortex..
References
- "WebGL Programming Guide"
No comments yet. Be the first to share your thoughts.