I. webview Tag
Electron provides the webview tag for embedding web pages:
Display external web content in an isolated frame and process.
It functions similarly to the iframe tag in HTML, but runs in an isolated process, primarily for security considerations.
From an application perspective, it's similar to Android's WebView, where the external environment has significant control over the embedded page, including CSS/JS injection, resource interception, etc., while the embedded page has minimal impact on the external environment. It's a relatively secure sandbox, for example, communication with the external environment can only occur through specific methods (such as Android's addJavascriptInterface()).
II. webContents
Like BrowserWindow, webview also has an associated webContents object.
Essentially, webContents is an EventEmitter that connects the page with its external environment:
webContents is an EventEmitter. It is responsible for rendering and controlling a web page and is a property of the BrowserWindow object.
III. Relationship Between webContents and webview
From the API list, it seems that most interfaces on webContents also exist on webview, so what is the relationship between them?
This question is not easy to answer, and there is no relevant information in the documentation or GitHub. In fact, this issue has little to do with Electron, it relates to Chromium.
Chromium is divided into six conceptual layers:
[caption id="attachment_1689" align="alignnone" width="473"]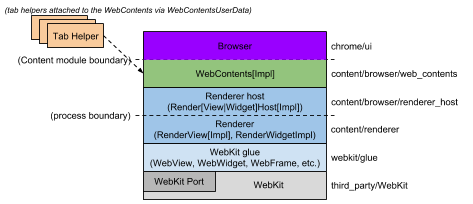 Chromium-conceptual-application-layers[/caption]
The middle layer is called webContents:
WebContents: A reusable component that is the main class of the Content module. It's easily embeddable to allow multiprocess rendering of HTML into a view. See the content module pages for more information.
(Quoted from How Chromium Displays Web Pages)
It is used to render HTML in a specified view area.
Temporarily returning to the Electron context, the view area is naturally specified by the webview tag. We define this area through width/height/layout. After determining the canvas, the webContents object associated with webview is responsible for rendering HTML, painting the embedded page content onto it.
So, under normal circumstances, the relationship should be one-to-one, meaning each webview has an associated webContents object. Therefore, there is reason to speculate that most interfaces on webview are just proxies to the corresponding webContents object. If this correspondence remains unchanged, then using interfaces from either should be the same, for example:
webview.addEventListener('dom-ready', onDOMReady);
// vs
webview.getWebContents().on('dom-ready', onDOMReady);
Functionally, they are roughly equivalent, both triggering only once when the page loads. The known difference is that initially there is no associated webContents object; it can only be obtained after the webview first triggers dom-ready:
webview.addEventListener('dom-ready', () => {
  console.log('webiew dom-ready');
});
//!!! Uncaught TypeError: webview.getWebContents is not a function
const webContents = webview.getWebContents();
You need to do it this way:
let webContents;
webview.addEventListener('dom-ready', e => {
  console.log('webiew dom-ready');
  if (!webContents) {
    webContents = webview.getWebContents();
    webContents.on('dom-ready', e => {
      console.log('webContents dom-ready');
    });
  }
});
So, webContents's dom-ready misses the first occurrence. From this scenario alone, webview's dom-ready event is more in line with expectations.
P.S. Exceptional circumstances refer to the fact that this one-to-one relationship is not fixed and can be manually modified. For example, you can put the DevTools of a certain webview into another webview. See Add API to set arbitrary WebContents as devtools for details.
P.S. Of course, Electron's webContents and Chromium's webContents are indeed closely related, but they are completely different concepts and implementations. Chromium's webContents is clearly responsible for doing the work, while Electron's webContents is just an EventEmitter. On one hand, it exposes internal state (events), and on the other hand, it provides interfaces to allow external influence on internal state and behavior (methods).
Frame
Besides webContents, the concept of Frame is also frequently encountered, also related to Chromium. But it's easy to understand because we see it every day in web environments, like iframe.
Each webContents object is associated with a Frame Tree, where each node on the tree represents a page. For example:
<!DOCTYPE html>
<html lang="en">
<head>
  <meta charset="UTF-8">
  <title>A</title>
</head>
<body>
  <iframe src="/B"/>
  <iframe src="/C"/>
</body>
</html>
When a browser opens this page, there will be 3 nodes on the Frame Tree, representing pages A, B, and C respectively. So, where can you see Frames?
[caption id="attachment_1690" align="alignnone" width="908"]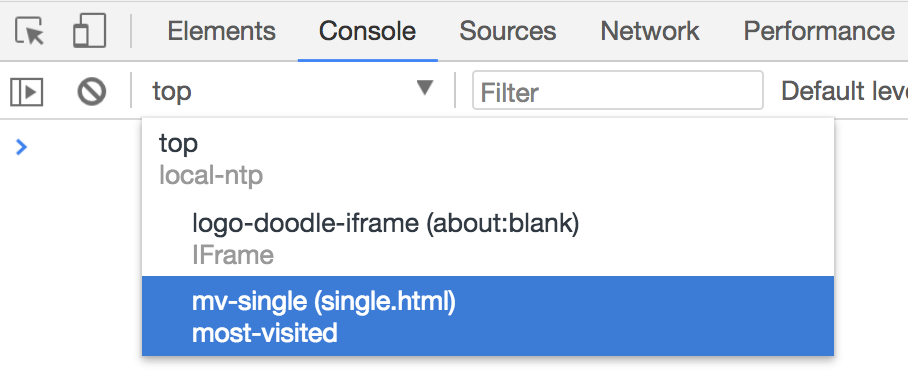 chrome-devtools-frames[/caption]
Each Frame corresponds to a page, and each page has its own window object. You can switch window context here.
IV. Overriding New Window Navigation
By default, webview only supports link navigation that opens in the current window (such as _self). For links that require opening in a new window, they will fail silently. For example:
<a href="http://www.ayqy.net/" target="_blank">黯羽轻扬</a>
<script>
  window.open('http://www.ayqy.net/', '_blank');
</script>
Such navigation produces no reaction; it won't open a new "window", nor will it load the target page in the current page. You need to override this default behavior:
webview.addEventListener('dom-ready', () => {
  const webContents = webview.getWebContents();
  webContents.on('new-window', (event, url) => {
    event.preventDefault();
    webview.loadURL(url);
  });
});
Prevent the default behavior and load the target page in the current webview.
P.S. There's an allowpopups attribute also related to window.open(), which supposedly defaults to false to disallow popups, but in practice I haven't found it to have any effect. See allowpopups for details.
V. Injecting CSS
You can inject CSS through the insertCSS(cssString) method, for example:
webview.insertCSS(`
  body, p {
    color: #ccc !important;
    background-color: #333 !important;
  }
`);
Simple and effective, it seems like the problem is solved. In fact, the injected styles disappear when navigating to a new page or refreshing. So you should re-inject when needed, like this:
webview.addEventListener('dom-ready', e => {
  // Inject CSS
  injectCSS();
});
Every time a new page loads or refreshes, the dom-ready event is triggered. Injecting here is just right.
VI. Injecting JS
There are 2 injection methods:
-
preloadattribute -
executeJavaScript()method
preload
The preload attribute can execute a specified script before all scripts inside webview execute.
Note that its value must be file protocol or asar protocol:
The protocol of script's URL must be either file: or asar:, because it will be loaded by require in guest page under the hood.
So it's a bit more troublesome:
// preload
const preloadFile = 'file://' + require('path').resolve('./preload.js');
webview.setAttribute('preload', preloadFile);
The preload environment can use Node APIs. So, it's another special environment that can use both Node APIs and access DOM/BOM. Another similar environment we're familiar with is renderer.
Additionally, the preload attribute only executes when the page loads for the first time. Subsequent loading of new pages will not execute the preload script again.
executeJavaScript
Another way to inject JS is through webview/webContents.executeJavaScript(), for example:
webview.addEventListener('dom-ready', e => {
  // Inject JS
  webview.executeJavaScript(`console.log('open <' + document.title + '> at ${new Date().toLocaleString()}')`);
});
executeJavaScript is more flexible in timing and can inject at any time on each page (for example, like injecting CSS, re-inject at dom-ready to achieve site-wide injection), but by default it cannot access Node APIs (requires enabling the nodeintegration attribute, mentioned at the end of this article).
Note that both webview and webContents have this interface, but there are differences:
-
contents.executeJavaScript(code[, userGesture, callback])Returns Promise - A promise that resolves with the result of the executed code or is rejected if the result of the code is a rejected promise.
-
<webview>.executeJavaScript(code[, userGesture, callback])Evaluates code in page. If userGesture is set, it will create the user gesture context in the page. HTML APIs like requestFullScreen, which require user action, can take advantage of this option for automation.
The most obvious difference is that one has a return value (returns Promise), and the other doesn't. For example:
webContents.executeJavaScript(`1 + 2`, false, result =>
  console.log('webContents exec callback: ' + result)
).then(result =>
  console.log('webContents exec then: ' + result)
);
// webview can only use callback
webview.executeJavaScript(`3 + 2`, false, result =>
  console.log('webview exec callback: ' + result)
)
// Uncaught TypeError: Cannot read property 'then' of undefined
// .then(result => console.log('webview exec then: ' + result))
Functionally, I haven't felt much difference, but such API design is indeed confusing.
VII. Mobile Device Emulation
webview provides device emulation API that can be used to emulate mobile devices, for example:
// Enable Device Emulation
webContents.setUserAgent('Mozilla/5.0 (iPhone; CPU iPhone OS 10_3_1 like Mac OS X) AppleWebKit/603.1.30 (KHTML, like Gecko) Version/10.0 Mobile/14E304 Safari/602.1');
const size = {
  width: 320,
  height: 480
};
webContents.enableDeviceEmulation({
  screenPosition: 'mobile',
  screenSize: size,
  viewSize: size
});
But the actual effect is weak; touch events are not supported. Additionally, Chrome DevTools opened through webview/webContents.openDevTools() doesn't have the Toggle device button (small phone icon). Related discussion can be found in webview doesn't render and support deviceEmulation.
So, if you want to emulate mobile devices like browser DevTools, webview cannot achieve this.
However, you can do it in another more brute-force way: open a BrowserWindow and use its DevTools:
// Create the browser window.
let win = new BrowserWindow({width: 800, height: 600});
// Load page
mainWindow.loadURL('http://ayqy.net/m/');

// Enable device emulation
const webContents = win.webContents;
webContents.enableDeviceEmulation({
  screenPosition: 'mobile',
  screenSize: { width: 480, height: 640 },
  deviceScaleFactor: 0,
  viewPosition: { x: 0, y: 0 },
  viewSize: { width: 480, height: 640 },
  fitToView: false,
  offset: { x: 0, y: 0 }
});

// Open the DevTools.
win.webContents.openDevTools({
  mode: 'bottom'
});
This way, there are no webview special environment limitations. Device emulation is very reliable, and touch events are also available. But the downside is that you need to open an independent window, which is a less pleasant experience.
VIII. Screenshot
webview also provides screenshot support: contents.capturePage([rect, ]callback), for example:
// Capture page
const delay = 5000;
setTimeout(() => {
  webContents.capturePage(image => {
    const base64 = image.toDataURL();
    // Use another webview to display the screenshot
    captureWebview.loadURL(base64);
    // Write to local file
    const buffer = image.toPNG();
    const fs = require('fs');
    const tmpFile = '/tmp/page.png';
    fs.open(tmpFile, 'w', (err, fd) => {
      if (err) throw err;
      fs.write(fd, buffer, (err, bytes) => {
        if (err) throw err;
        console.log(`write ${bytes}B to ${tmpFile}`);
      })
    });
  });
}, delay);
Take a screenshot after 5 seconds. Not passing rect defaults to capturing the entire screen (not the entire page, don't expect long screenshots, not supported). It returns a NativeImage instance that you can manipulate as you wish.
P.S. In actual use, I found that emulating device on webview and then taking a screenshot doesn't capture the emulation... whereas device emulation opened with BrowserWindow captures normally.
IX. Other Issues and Notes
1. Controlling webview Show/Hide
The conventional approach is webview.style.display = hidden ? 'none' : '', but this causes some strange issues, such as the page content area becoming smaller.
webview has issues being hidden using the hidden attribute or using display: none;. It can cause unusual rendering behaviour within its child browserplugin object and the web page is reloaded when the webview is un-hidden. The recommended approach is to hide the webview using visibility: hidden.
The general reason is that rewriting webview's display value is not allowed; it can only be flex/inline-flex. Other values cause strange issues.
The official recommendation is to use visibility: hidden to hide webview, but it still occupies space and may not meet layout needs. The community has an alternative method to display: none:
webview.hidden { width: 0px; height: 0px; flex: 0 1; }
P.S. For more discussion about showing/hiding webview, see webview contents don't get properly resized if window is resized when webview is hidden.
2. Allowing webview to Access Node APIs
The webview tag has a nodeintegration attribute to enable Node API access permissions. It's off by default.
<webview src="http://www.google.com/" nodeintegration></webview>
After enabling it as above, you can use Node APIs like require(), process in the page loaded by webview.
P.S. The JS file specified by the preload attribute allows use of Node APIs regardless of whether nodeintegration is enabled, but global state modifications will be cleared:
When the guest page doesn't have node integration this script will still have access to all Node APIs, but global objects injected by Node will be deleted after this script has finished executing.
3. Exporting Console Information
For JS injection scenarios, to facilitate debugging, you can get Console information through the webview's console-message event:
// Export console message
webview.addEventListener('console-message', e => {
  console.log('webview: ' + e.message);
});
This meets general debugging needs, but the drawback is that messages are transmitted via inter-process communication, so e.message is forcibly converted to a string. Therefore, outputting objects becomes [object Object] after toString().
4. Communication Between webview and renderer
There is a built-in IPC mechanism, simple and convenient. For example:
// renderer environment
webview.addEventListener('ipc-message', (event) => {
  //! The message attribute is called channel, which is strange, but that's how it is
  console.log(event.channel)
})
webview.send('our-secrets', 'ping')

// webview environment
const {ipcRenderer} = require('electron')
ipcRenderer.on('our-secrets', (e, message) => {
  console.log(message);
  ipcRenderer.sendToHost('pong pong')
})
P.S. The webview environment part can be completed through the preload attribute mentioned in the Injecting JS section.
If you handle the console-message event mentioned in the previous item, you will see Console output:
webview: ping
pong pong
5. Forward/Backward/Refresh/URL Navigation
webview doesn't provide these controls by default (unlike video tag, etc.), but it provides APIs to implement these behaviors, as follows:
// Forwards
if (webview.canGoForward()) {
  webview.goForward();
}
// Backwords
if (webview.canGoBack()) {
  webview.goBack();
}
// Refresh
webview.reload();
// loadURL
webview.loadURL(url);
See the Demo below for a complete example. For more APIs, see <webview> Tag and webContents.
X. Demo Address
GitHub repository: ayqy/electron-webview-quick-start
A simple single-tab browser. All content mentioned in this article is covered in the Demo, with comprehensive comments.
References
-
Electron Intercept HTTP request, response on BrowserWindow: Intercept resource requests
-
Chromium 网页加载过程简要介绍和学习计划: Another appearance by Luo Sheng, indeed everything is connected
No comments yet. Be the first to share your thoughts.