一。webview 標籤
Electron 提供了 webview 標籤,用來嵌入 Web 頁面:
Display external web content in an isolated frame and process.
作用上類似於 HTML 裡的 iframe 標籤,但跑在獨立進程中,主要出於安全性考慮
從應用場景來看,類似於 Android 的 WebView,外部對嵌入頁面的控制權較大,包括 CSS/JS 注入、資源攔截等,而嵌入頁面對外部的影響很小,是個相對安全的沙盒,例如僅可以通過一些特定方式與外部通信(如 Android 的 addJavascriptInterface())
二。webContents
像 BrowserWindow 一樣,webview 也擁有與之關聯的 webContents 對象
本質上,webContents 是個 EventEmitter,用來連通頁面與外部環境:
webContents is an EventEmitter. It is responsible for rendering and controlling a web page and is a property of the BrowserWindow object.
三。webContents 與 webview 的關係
從 API 列表上來看,似乎 webContents 身上的大多數接口,在 webview 身上也有,那麼二者是什麼關係?
這個問題不太容易弄明白,文檔及 GitHub 都沒有相關信息。實際上,這個問題與 Electron 關係不大,與 Chromium 有關
Chromium 在設計上分為六個概念層:
[caption id="attachment_1689" align="alignnone" width="473"]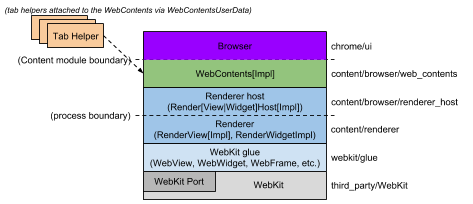 Chromium-conceptual-application-layers[/caption]
中間有一層叫 webContents:
WebContents: A reusable component that is the main class of the Content module. It's easily embeddable to allow multiprocess rendering of HTML into a view. See the content module pages for more information.
(引自 How Chromium Displays Web Pages)
用於在指定的視圖區域渲染 HTML
暫時回到 Electron 上下文,視圖區域當然由 webview 標籤來指定,我們通過寬高/佈局來圈定這塊區域。確定了畫布之後,與 webview 關聯的 webContents 對象負責渲染 HTML,把要嵌入的頁面內容畫上去
那麼,正常情況下,二者的關係應該是一對一的,即每個 webview 都有一個與之關聯的 webContents 對象,所以,有理由猜測 webview 身上的大多數接口,應該都只是代理到對應的 webContents 對象,如果這個對應關係保持不變,那麼用誰身上的接口應該都一樣,比如:
webview.addEventListener('dom-ready', onDOMReady);
// 與
webview.getWebContents().on('dom-ready', onDOMReady);
在功能上差不多等價,都只在頁面載入時觸發一次,已知的區別是初始時還沒有關聯 webContents 對象,要等到 webview 第一次 dom-ready 才能拿到關聯的 webContents 對象:
webview.addEventListener('dom-ready', () => {
  console.log('webiew dom-ready');
});
//!!! Uncaught TypeError: webview.getWebContents is not a function
const webContents = webview.getWebContents();
需要這樣做:
let webContents;
webview.addEventListener('dom-ready', e => {
  console.log('webiew dom-ready');
  if (!webContents) {
    webContents = webview.getWebContents();
    webContents.on('dom-ready', e => {
      console.log('webContents dom-ready');
    });
  }
});
所以,webContents 的 dom-ready 缺少了第一次,單從該場景看,webview 的 dom-ready 事件更符合預期
P.S.異常情況指的是,這個一對一關係並非固定不變,而是可以手動修改的,比如能夠把某個 webview 對應的 DevTools 塞進另一個 webview,具體見 Add API to set arbitrary WebContents as devtools
P.S. 當然,Electron 的 webContents 與 Chromium 的 webContents 確實有緊密聯繫,但二者從概念上和實現上都是完全不同的,Chromium 的 webContents 明顯是負責幹活的,而 Electron 的 webContents 只是個 EventEmitter,一方面把內部狀態暴露出去(事件),另一方面提供接口允許從外部影響內部狀態和行為(方法)
Frame
除了 webContents,還會經常見到 Frame 這個概念,同樣與 Chromium 有關。但很容易理解,因為 Web 環境天天見,比如 iframe
每個 webContents 對象都關聯一個 Frame Tree,樹上每個節點代表一個頁面。例如:
<!DOCTYPE html>
<html lang="en">
<head>
  <meta charset="UTF-8">
  <title>A</title>
</head>
<body>
  <iframe src="/B"/>
  <iframe src="/C"/>
</body>
</html>
瀏覽器打開這個頁面的話,Frame Tree 上會有 3 個節點,分別代表 A,B,C 頁面。那麼,在哪裡能看到 Frame 呢?
[caption id="attachment_1690" align="alignnone" width="908"]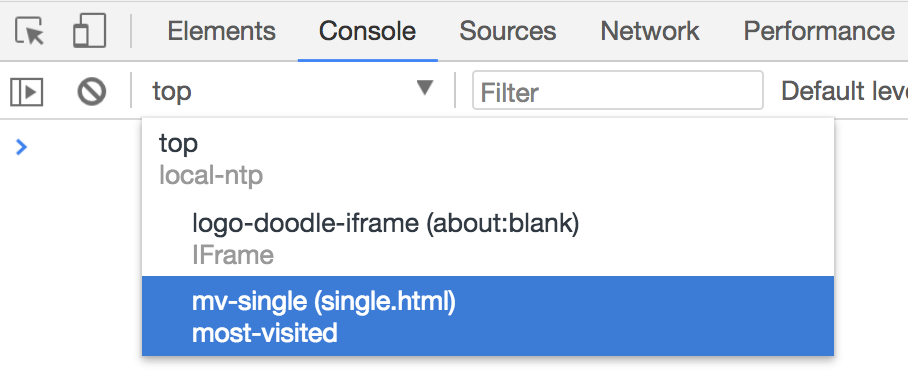 chrome-devtools-frames[/caption]
每個 Frame 對應一個頁面,每個頁面都有自己的 window 對象,在這裡切換 window 上下文
四。重寫新窗體跳轉
webview 預設只支持在當前窗體打開的連結跳轉(如 _self),對於要求在新窗體打開的,會靜默失敗,例如:
<a href="http://www.ayqy.net/" target="_blank">黯羽輕揚</a>
<script>
  window.open('http://www.ayqy.net/', '_blank');
</script>
此類跳轉沒有任何反應,不會開個新「窗體」,也不會在當前頁載入目標頁面,需要重寫掉這種預設行為:
webview.addEventListener('dom-ready', () => {
  const webContents = webview.getWebContents();
  webContents.on('new-window', (event, url) => {
    event.preventDefault();
    webview.loadURL(url);
  });
});
阻止預設行為,並在當前 webview 載入目標頁面
P.S. 有個 allowpopups 屬性也與 window.open() 有關,說是預設 false 不允許彈窗,實際使用沒發現有什麼作用,具體見 allowpopups
五。注入 CSS
可以通過 insertCSS(cssString) 方法注入 CSS,例如:
webview.insertCSS(`
  body, p {
    color: #ccc !important;
    background-color: #333 !important;
  }
`);
簡單有效,看似已經搞定了。實際上跳頁或者刷新,注入的樣式就沒了,所以應該在需要的時候再補一發,這樣做:
webview.addEventListener('dom-ready', e => {
  // Inject CSS
  injectCSS();
});
每次載入新頁或刷新都會觸發 dom-ready 事件,在這裡注入,恰到好處
六。注入 JS
有 2 種注入方式:
-
preload屬性 -
executeJavaScript()方法
preload
preload 屬性能夠在 webview 內所有腳本執行之前,先執行指定的腳本
注意,要求其值必須是 file 協議或者 asar 協議:
The protocol of script's URL must be either file: or asar:, because it will be loaded by require in guest page under the hood.
所以,要稍微麻煩一些:
// preload
const preloadFile = 'file://' + require('path').resolve('./preload.js');
webview.setAttribute('preload', preloadFile);
preload 環境可以使用 Node API,所以,又一個既能用 Node API,又能訪問 DOM、BOM 的特殊環境,我們熟悉的另一個類似環境是 renderer
另外,preload 屬性的特點是只在第一次載入頁面時執行,後續載入新頁不會再執行 preload 腳本
executeJavaScript
另一種注入 JS 的方式是通過 webview/webContents.executeJavaScript() 來做,例如:
webview.addEventListener('dom-ready', e => {
  // Inject JS
  webview.executeJavaScript(`console.log('open <' + document.title + '> at ${new Date().toLocaleString()}')`);
});
executeJavaScript 在時機上更靈活一些,可以在每個頁面隨時注入(比如像注入 CSS 一樣,dom-ready 時候補一發,實現整站注入),但預設無法訪問 Node API(需要開啟 nodeintegration 屬性,本文最後有提到)
注意,webview 與 webContents 身上都有這個接口,但存在差異:
-
contents.executeJavaScript(code[, userGesture, callback])Returns Promise - A promise that resolves with the result of the executed code or is rejected if the result of the code is a rejected promise.
-
<webview>.executeJavaScript(code[, userGesture, callback])Evaluates code in page. If userGesture is set, it will create the user gesture context in the page. HTML APIs like requestFullScreen, which require user action, can take advantage of this option for automation.
最明顯的區別是一個有返回值(返回 Promise),一個沒有返回值,例如:
webContents.executeJavaScript(`1 + 2`, false, result =>
  console.log('webContents exec callback: ' + result)
).then(result =>
  console.log('webContents exec then: ' + result)
);
// 而 webview 只能通過回調來取
webview.executeJavaScript(`3 + 2`, false, result =>
  console.log('webview exec callback: ' + result)
)
// Uncaught TypeError: Cannot read property 'then' of undefined
// .then(result => console.log('webview exec then: ' + result))
從作用上沒感受到太大區別,但這樣的 API 設計確實 讓人有些混亂
七。移動設備模擬
webview 提供了設備模擬 API,可以用來模擬移動設備,例如:
// Enable Device Emulation
webContents.setUserAgent('Mozilla/5.0 (iPhone; CPU iPhone OS 10_3_1 like Mac OS X) AppleWebKit/603.1.30 (KHTML, like Gecko) Version/10.0 Mobile/14E304 Safari/602.1');
const size = {
  width: 320,
  height: 480
};
webContents.enableDeviceEmulation({
  screenPosition: 'mobile',
  screenSize: size,
  viewSize: size
});
但實際效果很弱,不支持 touch 事件。另外,通過 webview/webContents.openDevTools() 打開的 Chrome DevTools 也不帶 Toggle device 按鈕(小手機圖標),相關討論具體見 webview doesn't render and support deviceEmulation
所以,要像瀏覽器 DevTools 一樣模擬移動設備的話,用 webview 是做不到的
那麼,可以通過另一種更粗暴的方式來做,開個 BrowserWindow,用它的 DevTools:
// Create the browser window.
let win = new BrowserWindow({width: 800, height: 600});
// Load page
mainWindow.loadURL('http://ayqy.net/m/');

// Enable device emulation
const webContents = win.webContents;
webContents.enableDeviceEmulation({
  screenPosition: 'mobile',
  screenSize: { width: 480, height: 640 },
  deviceScaleFactor: 0,
  viewPosition: { x: 0, y: 0 },
  viewSize: { width: 480, height: 640 },
  fitToView: false,
  offset: { x: 0, y: 0 }
});

// Open the DevTools.
win.webContents.openDevTools({
  mode: 'bottom'
});
這樣就不存在 webview 特殊環境的限制了,設備模擬非常靠譜,touch 事件也是可用的。但缺點是要開獨立窗體,體驗比較難受
八。截圖
webview 還提供了截圖支持,contents.capturePage([rect, ]callback),例如:
// Capture page
const delay = 5000;
setTimeout(() => {
  webContents.capturePage(image => {
    const base64 = image.toDataURL();
    // 用另一個 webview 把截屏展示出來
    captureWebview.loadURL(base64);
    // 寫入本地文件
    const buffer = image.toPNG();
    const fs = require('fs');
    const tmpFile = '/tmp/page.png';
    fs.open(tmpFile, 'w', (err, fd) => {
      if (err) throw err;
      fs.write(fd, buffer, (err, bytes) => {
        if (err) throw err;
        console.log(`write ${bytes}B to ${tmpFile}`);
      })
    });
  });
}, delay);
5s 後截屏,不傳 rect 預設截整屏(不是整頁,長圖不用想了,不支持),返回的是個 NativeImage 實例,想怎麼捏就怎麼捏
P.S. 實際使用發現,webview 設備模擬再截屏,截到的東西是不帶模擬的。。。而 BrowserWindow 開的設備模擬截屏是正常的
九。其它問題及注意事項
1. 控制 webview 顯示隱藏
常規做法是 webview.style.display = hidden ? 'none' : '',但會引發一些奇怪的問題,比如頁面內容區域變小了
webview has issues being hidden using the hidden attribute or using display: none;. It can cause unusual rendering behaviour within its child browserplugin object and the web page is reloaded when the webview is un-hidden. The recommended approach is to hide the webview using visibility: hidden.
大致原因是不允許重寫 webview 的 display 值,只能是 flex/inline-flex,其它值會引發奇怪問題
官方建議採用:visibility: hidden 來隱藏 webview,但仍然佔據空間,不一定能滿足佈局需要。社區有一種替代 display: none 的方法:
webview.hidden { width: 0px; height: 0px; flex: 0 1; }
P.S. 關於顯示隱藏 webview 的更多討論,見 webview contents don't get properly resized if window is resized when webview is hidden
2. 允許 webview 訪問 Node API
webview 標籤有個 nodeintegration 屬性,用來開啟 Node API 訪問權限,預設不開
<webview src="http://www.google.com/" nodeintegration></webview>
像上面開了之後可以在 webview 載入的頁面裡使用 Node API,如 require(),process
P.S.preload 屬性指定的 JS 文件允許使用 Node API,無論開不開 nodeintegration,但全局狀態修改會被清掉:
When the guest page doesn't have node integration this script will still have access to all Node APIs, but global objects injected by Node will be deleted after this script has finished executing.
3. 匯出 Console 信息
對於注入 JS 的場景,為了方便調試,可以通過 webview 的 console-message 事件拿到 Console 信息:
// Export console message
webview.addEventListener('console-message', e => {
  console.log('webview: ' + e.message);
});
能滿足一般調試需要,但缺陷是,消息是跨進程通信傳過來的,所以 e.message 會被強轉字符串,所以輸出的對象會變成 toString() 後的 [object Object]
4.webview 與 renderer 通信
有內建的 IPC 機制,簡單方便,例如:
// renderer 環境
webview.addEventListener('ipc-message', (event) => {
  //! 消息屬性叫 channel,有些奇怪,但就是這樣
  console.log(event.channel)
})
webview.send('our-secrets', 'ping')

// webview 環境
const {ipcRenderer} = require('electron')
ipcRenderer.on('our-secrets', (e, message) => {
  console.log(message);
  ipcRenderer.sendToHost('pong pong')
})
P.S.webview 環境部分可以通過注入 JS 小節提到的 preload 屬性來完成
如果處理了上一條提到的 console-message 事件,將看到 Console 輸出:
webview: ping
pong pong
5. 前進/後退/刷新/地址跳轉
webview 預設沒有提供這些控件(不像 video 標籤之類的),但提供了用來實現這些行為的 API,如下:
// Forwards
if (webview.canGoForward()) {
  webview.goForward();
}
// Backwords
if (webview.canGoBack()) {
  webview.goBack();
}
// Refresh
webview.reload();
// loadURL
webview.loadURL(url);
完整示例見下面 Demo,更多 API 見 <webview> Tag 與 webContents
十。Demo 地址
GitHub 倉庫:ayqy/electron-webview-quick-start
一個簡單的單 tab 瀏覽器,本文中提到的所有內容在 Demo 中都有涉及,註釋詳盡
暫無評論,快來發表你的看法吧